Are your kitchen cabinets outdated or damaged? Removing them might seem like a tough job, but with the right steps, you can do it yourself and save money.
Imagine the satisfaction of clearing out old cabinets and making space for a fresh, new look. In this guide, you’ll discover simple, clear instructions to safely and efficiently remove your kitchen cabinets. Ready to take control of your kitchen makeover?
Keep reading—you’re closer than you think to a brand-new space!
:max_bytes(150000):strip_icc()/how-to-remove-kitchen-cabinets-8304279-hero-30b6ec50f04347ea8ef6dd85178cab25.jpg)
Credit: www.thespruce.com
Prepare The Workspace
Preparing the workspace is the first step to remove kitchen cabinets safely and easily.
It helps avoid accidents and keeps your kitchen clean during the process.
Organizing the area and having tools ready makes the job faster and smoother.
Clear The Kitchen Area
Remove all items from countertops and cabinets. Clear out dishes, food, and small appliances.
Move furniture and rugs away from the cabinets. This prevents damage and creates space to work.
Cover floors with a drop cloth or old sheets. This protects your floor from dust and debris.
Gather Necessary Tools
Get all tools before starting. Common tools include a screwdriver, drill, pry bar, and hammer.
Have safety gear ready like gloves and safety glasses. These protect your hands and eyes.
Keep a flashlight nearby for dark corners. It helps you see screws and nails clearly.
Turn Off Power And Water
Switch off the power to outlets near the cabinets. This prevents electrical shocks.
Turn off the water supply if cabinets have plumbing. Avoid water leaks and damage.
Check that power and water are completely off before starting work. Safety first.
Remove Cabinet Doors And Hardware
Removing cabinet doors and hardware is the first step in taking down kitchen cabinets. This step makes the process easier and safer. It helps prevent damage to the doors and the cabinet frame. Work slowly to avoid stripping screws or breaking parts.
Unscrew Hinges
Start by opening the cabinet doors wide. Use a screwdriver to remove the screws from the hinges. Hold the door steady while you work. Keep the screws in a small container to avoid losing them. Carefully pull the door away from the cabinet once all screws are out.
Take Off Handles And Knobs
Next, focus on the handles and knobs. Turn the screws on the inside of the door or drawer to remove them. Use a screwdriver that fits the screw heads well. Keep the hardware organized for reuse or replacement. Removing these parts helps with cabinet removal and makes refinishing easier.
Detach Cabinets From Walls
Detaching kitchen cabinets from walls is a key step in cabinet removal. It requires care to avoid damage to walls and cabinets. This process involves finding and removing screws that hold the cabinets in place. Cabinets in corners need special attention because they attach differently. Following the right steps helps keep the job safe and easy.
Locate And Remove Screws
Start by opening cabinet doors and looking inside. Most screws are hidden in the cabinet frame or shelves. Use a flashlight to find all screws. They may be on the sides, top, or back of the cabinet. Use a drill or screwdriver to remove each screw carefully. Keep screws in a container to avoid losing them.
Handle Corner Cabinets
Corner cabinets often connect to two walls. Check both walls for screws. Some corner cabinets have extra brackets for support. Look behind or under the cabinet for these brackets. Remove all screws and brackets before pulling the cabinet away. Pull gently to avoid breaking the cabinet or damaging walls.
Take Down Base Cabinets
Taking down base cabinets is a key step in removing kitchen cabinets. It requires care and attention to avoid damage. These cabinets sit on the floor and often connect to plumbing. Removing them safely helps prepare your kitchen for new cabinets or renovations.
Follow simple steps to make this task easier and safer. Focus on checking for plumbing and lifting the cabinets carefully. This ensures a smooth removal process without causing harm to your kitchen.
Check For Plumbing Connections
Base cabinets may hide plumbing pipes and fixtures. Look inside and behind cabinets for water lines or drains. Turn off the water supply before touching any pipes. Disconnect plumbing parts gently to avoid leaks. Use a wrench or pliers if needed. Keep a bucket nearby to catch any drips. This step prevents water damage during cabinet removal.
Lift Cabinets Carefully
Base cabinets can be heavy and bulky. Ask for help if the cabinets are large or heavy. Use proper lifting techniques to protect your back. Lift from the bottom and keep the cabinet close to your body. Avoid dragging cabinets across the floor to prevent damage. Place the cabinets on a soft surface after removal. Take your time to prevent accidents or injuries.
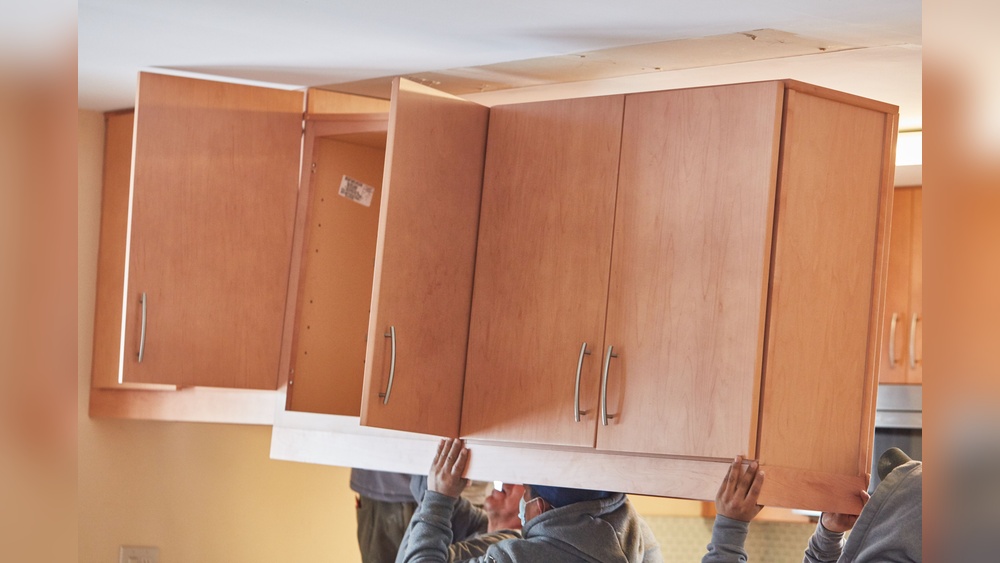
Remove Upper Cabinets
Removing upper kitchen cabinets can be tricky. These cabinets are heavy and fixed to the wall. Taking them down safely needs care and the right steps. Start by clearing the cabinet contents. This makes the cabinets lighter and easier to handle.
Next, turn off the power to any lights or outlets inside the cabinets. This step avoids accidents. Use a screwdriver or drill to remove screws holding the cabinet to the wall. Keep the screws in a safe place if you plan to reuse them.
Support Cabinets While Unscrewing
Always support the cabinet before you remove screws. Use a sturdy board or a cabinet jack to hold it in place. This prevents the cabinet from falling and causing damage or injury. Hold the cabinet firmly while removing each screw slowly. Do not rush this process.
Work With A Partner
Having a partner makes this job easier and safer. One person can hold the cabinet steady. The other can focus on unscrewing and lifting. Communicate clearly to avoid mistakes. Two people sharing the work reduce the risk of accidents.
Clean Up After Removal
Cleaning up after removing kitchen cabinets is an important step. It prepares your space for the next phase of your kitchen project. A clean area helps prevent accidents and damage. It also makes it easier to see what repairs or updates you need.
Dispose Of Debris
Start by gathering all broken cabinet parts, screws, and nails. Use heavy-duty trash bags or bins for disposal. Separate wood, metal, and plastic for recycling if possible. Remove dust and small debris with a broom or vacuum. Keep the space tidy to avoid tripping or injury.
Inspect Walls And Floors
Look closely at the walls where cabinets were attached. Check for holes, cracks, or water damage. Examine the floors for scratches or stains from cabinet removal. Note any areas that need filling or patching. This step saves time and money during kitchen renovation.
Prepare For New Installation
Preparing for new kitchen cabinet installation is an important step after removing old cabinets. It ensures the new cabinets fit well and look great. Proper preparation saves time and avoids problems during installation.
Repair Wall Damage
Removing old cabinets often leaves holes or scratches on walls. Fix these damages before installing new cabinets. Use spackle or wall filler to cover holes. Sand the area smooth once dry. A clean, even wall helps new cabinets sit flush. This repair also improves the kitchen’s overall look.
Measure For New Cabinets
Accurate measurements are key to a perfect fit. Measure the width, height, and depth of the available space. Check for any obstacles like pipes or outlets. Note these details to avoid cabinet fitting issues. Double-check measurements for accuracy. Correct measurements help you choose the right cabinets and prevent costly mistakes.

Credit: www.youtube.com

Credit: www.wikihow.com
Frequently Asked Questions
How Do I Safely Remove Kitchen Cabinets?
Turn off power and water first. Remove cabinet doors, shelves, and screws. Use a pry bar carefully to detach cabinets from the wall without damaging drywall.
What Tools Are Needed To Remove Kitchen Cabinets?
You’ll need a screwdriver, drill, pry bar, utility knife, and a hammer. Safety gloves and goggles are also essential for protection during removal.
Can I Remove Kitchen Cabinets Without Damaging Walls?
Yes, by gently prying cabinets and removing screws slowly. Use a utility knife to cut caulking or paint edges to avoid peeling drywall.
How Long Does It Take To Remove Kitchen Cabinets?
It usually takes 2 to 4 hours depending on cabinet size and complexity. Experienced DIYers may finish faster, while beginners should allow extra time.
Conclusion
Removing kitchen cabinets takes some care and simple steps. Start by clearing the area and turning off the power. Use the right tools to unscrew and carefully detach each cabinet. Watch for nails or screws that might hold cabinets in place.
Take your time to avoid damage to walls or floors. With patience and care, the job becomes easier. Soon, you can prepare your kitchen for new cabinets or a fresh look. A small effort now saves big trouble later. Ready for your next kitchen project?

As the chief content writer, Hassan Al Sarker works as a professional kitchen-based content creator at Kitchen Liker.
In addition to reviewing the content published on Kitchen Liker, he ensures that it is accurate, relevant, and helpful. As a result, all the reviews and information published at Kitchen Liker are neutral and userfriendly.
Hassan Al Sarker has a bachelor’s degree in Hotel and Tourism Management From the Newyork University. Before joining Kitchen Liker, he was a contributor at Kitchen Club, United States.